crypto tab 비트코인채굴 (크립토 탭)

비트코인&잡코인 2018. 7. 23. 09:36

구글에서 나온 채굴브라우져 crypto tab을 소개합니다 


https://get.cryptobrowser.site/2039117


여기 접속해서 다운받고 설치하시면 크롬이 아닌 비트코인 채굴할수잇는 브라우져가 설치됩니다 

여기서 중요한건 페이스북이나 구글아이디 vk 트위터로 로그인은 한번 해주셔야된다는겁니다.

혹시나 로그인을 안할시에 다른 pc나 핸드폰으로 접속시 동기화가 안되요~!! 주의하세요~!


로그인한후 둘러보시기 바랍니다 


posted by fori`s

mysql mariadb설치

리눅스/Centos 2017. 11. 2. 09:56

본 내용은 다음과 같은 환경을 전제로 작성되었습니다.


MariaDB 5.5.37 (설치하고 나서 보니 MariaDB 5.5.41 로 설치가 되었다. 약간 업그레드 버전이군요. ^^)

CentOS release 7.0


2. MariaDB 설치


MariaDB를 위한 yum Repository 를 추가하기 위해 아래와 같이 "MariaDB.repo" 파일을 작성합니다.


# vi /etc/yum.repos.d/MariaDB.repo

"MariaDB.repo" 파일에 다음의 내용을 입력합니다.


[mariadb]

name = MariaDB

baseurl = http://yum.mariadb.org/5.5/centos7-amd64

gpgkey=https://yum.mariadb.org/RPM-GPG-KEY-MariaDB

gpgcheck=1


yum을 이용하여 MariaDB-server와 MariaDB- client 를 설치합니다.

#  yum install MariaDB-server MariaDB-client


설치된 MariaDB를 실행합니다.

#   /etc/init.d/mysql start


3. root 패스워드와 외부 접속 설정


Mariadb root password 변경은 다음과 같이 진행합니다.


[admin@localhost ~]$ /usr/bin/mysql -u root mysql

Reading table information for completion of table and column names

You can turn off this feature to get a quicker startup with -A


Welcome to the MariaDB monitor.  Commands end with ; or \g.

Your MariaDB connection id is 2

Server version: 5.5.40-MariaDB MariaDB Server


Copyright (c) 2000, 2014, Oracle, Monty Program Ab and others.


Type 'help;' or '\h' for help. Type '\c' to clear the current input statement.


MariaDB [mysql]> update user set password=password('비밀번호') where user='root';

Query OK, 4 rows affected (0.00 sec)

Rows matched: 4  Changed: 4  Warnings: 0


MariaDB [mysql]> flush privileges;

Query OK, 0 rows affected (0.00 sec)


MariaDB [mysql]> quit

Bye 


MariaDB 재시작


#   service mysql stop

#   service mysql start


사용자 접속 정보 확인


[admin@localhost ~]$  /usr/bin/mysql -u root -p mysql

Enter password: 

Reading table information for completion of table and column names

You can turn off this feature to get a quicker startup with -A


Welcome to the MariaDB monitor.  Commands end with ; or \g.

Your MariaDB connection id is 4

Server version: 5.5.40-MariaDB MariaDB Server


Copyright (c) 2000, 2014, Oracle, Monty Program Ab and others.


Type 'help;' or '\h' for help. Type '\c' to clear the current input statement.


MariaDB [mysql]> select user,host,password from user;


+------+-----------------------+-------------------------------------------+

 user  host                   password                                  

+------+-----------------------+-------------------------------------------+

 root  localhost              *889C926028E12783CDA5CF3FA3FAEDD7D98C2CB6 

 root  localhost.localdomain  *889C926028E12783CDA5CF3FA3FAEDD7D98C2CB6 

 root  127.0.0.1              *889C926028E12783CDA5CF3FA3FAEDD7D98C2CB6 

 root  ::1                    *889C926028E12783CDA5CF3FA3FAEDD7D98C2CB6 

       localhost                                                        

       localhost.localdomain                                            

+------+-----------------------+-------------------------------------------+

6 rows in set (0.00 sec)


외부에서 root 로그인


MariaDB [mysql]> grant all privileges on *.* to 'root'@'192.%' identified by '비밀번호' with grant option;

Query OK, 0 rows affected (0.01 sec) 


[admin@localhost ~]$  /usr/bin/mysql -u root -p mysql


Enter password: 


Reading table information for completion of table and column names


You can turn off this feature to get a quicker startup with -A


Welcome to the MariaDB monitor.  Commands end with ; or \g.


Your MariaDB connection id is 4


Server version: 5.5.40-MariaDB MariaDB Server


Copyright (c) 2000, 2014, Oracle, Monty Program Ab and others.


Type 'help;' or '\h' for help. Type '\c' to clear the current input statement.


MariaDB [mysql]> create database wordpress character set utf8 collate utf8_general_ci;


MariaDB [mysql]> CREATE USER 'wordpress'@'%' IDENTIFIED BY 'wordpress';


MariaDB [mysql]> grant all privileges on wordpress.* to 'wordpress'@'localhost' identified by 'wordpress' with grant option;


MariaDB [mysql]> flush privileges;


참고사항 

MariaDB 프로그램 설치경로 : /usr/lib64/mysql

MariaDB 설정파일 경로 : /etc/my.cnf

출처 : http://www.websaram.com/bbs/board.php?bo_table=web_server&wr_id=50


'리눅스 > Centos' 카테고리의 다른 글

아파치 설치  (0) 2017.11.02
CentOS 7 Oracle 11G Release 2 (11.2) DB 설치  (0) 2017.10.26
centos7 톰캣설치  (0) 2017.10.12
centos7 재부팅후 명령어  (0) 2017.10.12
posted by fori`s

아파치 설치

리눅스/Centos 2017. 11. 2. 09:47

실행환경

centos 7.0 에 httpd 2.4.6 설치


아파치가 설치되어 있나 확인해 본다.

결과는 없다.

[root@localhost ~]# which httpd

/usr/bin/which: no httpd in (/usr/local/bin:/usr/local/sbin:/usr/bin:/usr/sbin:/bin:/sbin)


아파치는 최신 버전을 설치한다.

먼저 아파치 버전을 확인해 본다.

[root@localhost ~]# yum list | grep httpd

httpd.x86_64                            2.4.6-19.el7.centos            updates  

httpd-devel.x86_64                      2.4.6-19.el7.centos            updates  

httpd-manual.noarch                     2.4.6-19.el7.centos            updates  

httpd-tools.x86_64                      2.4.6-19.el7.centos            updates  

libmicrohttpd.i686                      0.9.33-2.el7                   base     

libmicrohttpd.x86_64                    0.9.33-2.el7                   base     

libmicrohttpd-devel.i686                0.9.33-2.el7                   base     

libmicrohttpd-devel.x86_64              0.9.33-2.el7                   base     

libmicrohttpd-doc.noarch                0.9.33-2.el7                   base     


아파치를 설치한다.

설치중 관련 패키지를 설치할 것이냐고 묻는데 y라고 입력하고 엔터를 치자.

[root@localhost ~]# yum install httpd

Loaded plugins: fastestmirror, langpacks

base                                                     | 3.6 kB     00:00     

extras                                                   | 3.4 kB     00:00     

mariadb                                                  | 1.9 kB     00:00     

updates                                                  | 3.4 kB     00:00     

Loading mirror speeds from cached hostfile

 * base: centos.tt.co.kr

 * extras: centos.tt.co.kr

 * updates: centos.tt.co.kr

Resolving Dependencies

--> Running transaction check

---> Package httpd.x86_64 0:2.4.6-19.el7.centos will be installed

--> Processing Dependency: httpd-tools = 2.4.6-19.el7.centos for package: httpd-2.4.6-19.el7.centos.x86_64

--> Processing Dependency: /etc/mime.types for package: httpd-2.4.6-19.el7.centos.x86_64

--> Processing Dependency: libaprutil-1.so.0()(64bit) for package: httpd-2.4.6-19.el7.centos.x86_64

--> Processing Dependency: libapr-1.so.0()(64bit) for package: httpd-2.4.6-19.el7.centos.x86_64

--> Running transaction check

---> Package apr.x86_64 0:1.4.8-3.el7 will be installed

---> Package apr-util.x86_64 0:1.5.2-6.el7 will be installed

---> Package httpd-tools.x86_64 0:2.4.6-19.el7.centos will be installed

---> Package mailcap.noarch 0:2.1.41-2.el7 will be installed

--> Finished Dependency Resolution


Dependencies Resolved


================================================================================

 Package           Arch         Version                     Repository     Size

================================================================================

Installing:

 httpd             x86_64       2.4.6-19.el7.centos         updates       2.7 M

Installing for dependencies:

 apr               x86_64       1.4.8-3.el7                 base          103 k

 apr-util          x86_64       1.5.2-6.el7                 base           92 k

 httpd-tools       x86_64       2.4.6-19.el7.centos         updates        78 k

 mailcap           noarch       2.1.41-2.el7                base           31 k


Transaction Summary

================================================================================

Install  1 Package (+4 Dependent packages)


Total download size: 3.0 M

Installed size: 10 M

Is this ok [y/d/N]: y

Downloading packages:

(1/5): mailcap-2.1.41-2.el7.noarch.rpm                     |  31 kB   00:00     

(2/5): httpd-tools-2.4.6-19.el7.centos.x86_64.rpm          |  78 kB   00:00     

(3/5): apr-1.4.8-3.el7.x86_64.rpm                          | 103 kB   00:00     

(4/5): apr-util-1.5.2-6.el7.x86_64.rpm                     |  92 kB   00:00     

(5/5): httpd-2.4.6-19.el7.centos.x86_64.rpm                | 2.7 MB   00:01     

--------------------------------------------------------------------------------

Total                                              1.5 MB/s | 3.0 MB  00:01     

Running transaction check

Running transaction test

Transaction test succeeded

Running transaction

  Installing : apr-1.4.8-3.el7.x86_64                                       1/5 

  Installing : apr-util-1.5.2-6.el7.x86_64                                  2/5 

  Installing : httpd-tools-2.4.6-19.el7.centos.x86_64                       3/5 

  Installing : mailcap-2.1.41-2.el7.noarch                                  4/5 

  Installing : httpd-2.4.6-19.el7.centos.x86_64                             5/5 

  Verifying  : httpd-2.4.6-19.el7.centos.x86_64                             1/5 

  Verifying  : mailcap-2.1.41-2.el7.noarch                                  2/5 

  Verifying  : httpd-tools-2.4.6-19.el7.centos.x86_64                       3/5 

  Verifying  : apr-util-1.5.2-6.el7.x86_64                                  4/5 

  Verifying  : apr-1.4.8-3.el7.x86_64                                       5/5 


Installed:

  httpd.x86_64 0:2.4.6-19.el7.centos                                            


Dependency Installed:

  apr.x86_64 0:1.4.8-3.el7                     apr-util.x86_64 0:1.5.2-6.el7    

  httpd-tools.x86_64 0:2.4.6-19.el7.centos     mailcap.noarch 0:2.1.41-2.el7    


Complete!


설치가 완료 되었다.

아파치 버전을 확인해 보자.

[root@localhost ~]# httpd -v

Server version: Apache/2.4.6 (CentOS)

Server built:   Jan 12 2015 13:22:31


아파치를 시작해 보자.

명령어가 조금 바뀌었다고 한다. 예전 명령어를 자동으로 현재의 명령어를 바꾸어서 실행해 준다.

[root@localhost ~]# service httpd start

Redirecting to /bin/systemctl start  httpd.service


아파치 상태를 확인해 보자.

[root@localhost ~]# service httpd status

Redirecting to /bin/systemctl status  httpd.service

httpd.service - The Apache HTTP Server

   Loaded: loaded (/usr/lib/systemd/system/httpd.service; disabled)

   Active: active (running) since 금 2015-02-13 20:50:28 KST; 2min 16s ago

 Main PID: 16657 (httpd)

   Status: "Total requests: 0; Current requests/sec: 0; Current traffic:   0 B/sec"

   CGroup: /system.slice/httpd.service

           ├─16657 /usr/sbin/httpd -DFOREGROUND

           ├─16658 /usr/sbin/httpd -DFOREGROUND

           ├─16659 /usr/sbin/httpd -DFOREGROUND

           ├─16662 /usr/sbin/httpd -DFOREGROUND

           ├─16663 /usr/sbin/httpd -DFOREGROUND

           └─16665 /usr/sbin/httpd -DFOREGROUND


 2월 13 20:50:27 localhost.localdomain systemd[1]: Starting The Apache HTTP ...

 2월 13 20:50:27 localhost.localdomain httpd[16657]: AH00558: httpd: Could n...

 2월 13 20:50:28 localhost.localdomain systemd[1]: Started The Apache HTTP S...

Hint: Some lines were ellipsized, use -l to show in full.


부팅할 때 아파치를 자동으로 시작하도록 설정한다.

[root@localhost ~]# systemctl enable httpd.service

ln -s '/usr/lib/systemd/system/httpd.service' '/etc/systemd/system/multi-user.target.wants/httpd.service'


바로 위에서 설정한 값이 제대로 입력 되었는지 확인해 본다.

enabled면 제대로 된 것이다.

[root@localhost ~]# systemctl list-unit-files --type=service |grep httpd

httpd.service                               enabled 

[root@localhost ~]#


제대로 설치 되었는지 확인해 본다.

centos에 기본으로 설치된 브라우저  파이어폭스에서 아래와 같이 입력해 본다.

http://localhost/  


실제 홈페이지 경로는 /var/www/html

아파치 프로그램이 설치된 경로는 /etc/httpd

아파치 설정파일 경로는 /etc/httpd/conf/httpd.conf


아파치(httpd) 시작/멈춤/재시작 명령어

 시작 systemctl start httpd.service

 멈춤 systemctl stop httpd.service

 재시작 systemctl restart httpd.service


아파치 설정파일 에러검사

[root@localhost ~]# apachectl configtest
AH00558: httpd: Could not reliably determine the server's fully qualified domain name, using localhost.localdomain. Set the 'ServerName' directive globally to suppress this message
Syntax OK

아직 설정 파일을 전혀 수정하지 않은 상태.

아직 도메인등을 설정하지 않아서 위와 같이 출력이 된다.

마지막에 systax ok이면 정상.


출처 : http://www.websaram.com/bbs/board.php?bo_table=web_server&wr_id=50

'리눅스 > Centos' 카테고리의 다른 글

mysql mariadb설치  (0) 2017.11.02
CentOS 7 Oracle 11G Release 2 (11.2) DB 설치  (0) 2017.10.26
centos7 톰캣설치  (0) 2017.10.12
centos7 재부팅후 명령어  (0) 2017.10.12
posted by fori`s

CentOS 7 Oracle 11G Release 2 (11.2) DB 설치

리눅스/Centos 2017. 10. 26. 13:49


CentOS 7에 오라클 데이터베이스를 설치하도록 하겠습니다.


1. 오라클 데이터베이스 다운

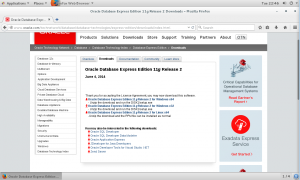
1) 오라클 홈페이지에 접속합니다.

1

2) Oracle Database Express Edition 11g Release 2 for Linux x64를 다운받습니다.

경로 : http://www.oracle.com/technetwork/database/database-technologies/express-edition/downloads/index.html

2


2. 오라클 데이터베이스 설치

1) unzip 명령어를 사용하여 다운받은 파일의 압축을 해제합니다.

unzip oracle-xe-11.2.0-1.0.x86_64.rpm.zip

3

2) 압축이 풀린 Disk1 디렉토리에 들어갑니다.

cd Disk1

4

3) rpm 명령어를 사용하여서 rpm 파일을 설치합니다. rpm -ivh의 i는 새로운 패키지를 설치하라는 옵션이고, v는 메시지를 자세히 보여달라는 의미, h는 패키지를 풀 때 해시태그를 표시하라는 의미입니다.

rpm -ivh oracle-xe-11.2.0-1.0.x86_64.rpm

5


3. 오라클 데이터베이스 설정

1) 설치된 오라클 데이터베이스 설정을 위하여 /etc/init.d 디렉토리 들어갑니다.

cd /etc/init.d

6

2) ./oracle-xe configure 명령어는 오라클 데이터베이스의 환경설정을 합니다. 비밀번호를 입력은 system 계정으로 로그인시 필요한 비밀번호이니 꼭 외워두셔야 합니다.

./oracle-xe configure

7

9

3) 설치한 경로로 이동합니다

cd /u01/app/oracle/product/11.2.0/xe/bin

10

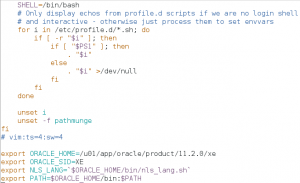
4) oracle_env.sh 파일을 열면 다음과 같은 내용이 있습니다. 이 파일은 오라클 데이터베이스 환경변수로서 bashsrc 파일에 소스코드를 추가할 예정이므로 복사합니다.

vi oracle_env.sh

12.5

13

5) bashrc 파일은 bash 셀을 사용하는 사용자들의 환경변수를 등록하는 파일입니다. bashrc 소스코드 맨 마지막에 복사한 소스코드를 붙여넣습니다.

cd /etc

vi bashrc

12

14

6) source 명령어를 통하여 수정한 bashrc 를 업데이트 합니다.

source bashrc

15

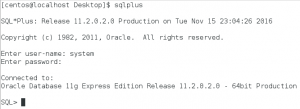
7) 어느 유저로 로그인하든 sqlplus 명령어를 통하여 오라클 데이터베이스에 접근 가능합니다.

sqlplus

16


다음과 같이 따라하시면 오라클 데이터베이스를 설치할 수 있습니다.


출처 :http://blog.ableit.co.kr/?p=1640


'리눅스 > Centos' 카테고리의 다른 글

mysql mariadb설치  (0) 2017.11.02
아파치 설치  (0) 2017.11.02
centos7 톰캣설치  (0) 2017.10.12
centos7 재부팅후 명령어  (0) 2017.10.12
posted by fori`s

오라클 sql developer 4.1.1 다운로드 싸이트

DB 2017. 10. 26. 10:16

http://www.oracle.com/technetwork/developer-tools/sql-developer/downloads/sqldev-downloads-v411-2744221.html

'DB' 카테고리의 다른 글

오라클 sql문  (0) 2017.10.25
posted by fori`s

오라클 sql문

DB 2017. 10. 25. 12:27

sql접속 (처음접속시 관리자권한 아이디로 접속)

sqlplus 아이디/암호
관리자 아이디는 system 암호는 설치할때 넣은 암호


중요한것은 명령어 뒤에 ; 이걸써야 끝내는 암호


계정만들기
create user 아이디 identified by 암호;


권한부여

grant connect, resource to 아이디;
가운데 쉼표 , 로 넣어야됨
안그러면 오류남


테이블 만들기

create table member(
id varchar2(20) primary key,
pw varchar2(20),
name varchar2(20),
phone varchar2(20));


테이블 확인

select * from tab;


회원만들기

insert into 테이블명 (id, pw, name, phone) values ('abc', '123', '홍길동', '010-111-1234');

예) insert into member (id, pw, name, phone) values ('abc', '123', '홍길동', '010-111-1234');


테이블안에 내용을 뽑기

전체조회) select * from member;

부분조회) select name from member;


삭제하기

delete from member where name='홍길동';

delete from (테이블명) where (조건)

조건 : phone='010-000-0000'; 이런식으로 넣으면된다


수정하기

update 테이블명 set (컬럼이름) where (조건)

예) update member set pw='000' where id='ghi';

ghi의 비번을 000으로 바꾸겠다 라는 명령어입니다


테이블 전체 삭제

drop table member;

              (테이블명)


'DB' 카테고리의 다른 글

오라클 sql developer 4.1.1 다운로드 싸이트  (0) 2017.10.26
posted by fori`s

리눅스 압축풀기 명령어

리눅스 2017. 10. 12. 10:15

리눅스를 사용하다 보면, tar 혹은 tar.gz로 압축을 하거나 압축을 풀어야 할 경우가 자주 생긴다.


이를 처리하기 위해 리눅스에서는 tar 라는 명령어를 사용하게 되는데,


tar 명령어도 여러가지 옵션이 있지만 각 옵션에 대해서 알아보기 보단, 자주 사용하는 명령어 패턴만 정리한다.


1. tar로 압축하기

> tar -cvf [파일명.tar] [폴더명]


ex) abc라는 폴더를 aaa.tar로 압축하고자 한다면

     > tar -cvf aaa.tar abc


2. tar 압축 풀기

> tar -xvf [파일명.tar]


ex) aaa.tar라는 tar파일 압축을 풀고자 한다면

     > tar -xvf aaa.tar


3. tar.gz로 압축하기

> tar -zcvf [파일명.tar.gz] [폴더명]


ex) abc라는 폴더를 aaa.tar.gz로 압축하고자 한다면

     > tar -zcvf aaa.tar.gz abc


4. tar.gz 압축 풀기

> tar -zxvf [파일명.tar.gz]


ex) aaa.tar.gz라는 tar.gz파일 압축을 풀고자 한다면

     > tar -zxvf aaa.tar.gz


참고로, 위의 옵션들을 포함한 그나마 자주 사용되는 tar 명령어의 옵션들은 아래와 같다.


 옵션

 설명

 -c

 파일을 tar로 묶음

 -p

 파일 권한을 저장

 -v

 묶거나 파일을 풀 때 과정을 화면으로 출력

 -f

 파일 이름을 지정

 -C

 경로를 지정

 -x

 tar 압축을 풂

 -z

 gzip으로 압축하거나 해제함


출처: http://nota.tistory.com/53 [nota's story]

'리눅스' 카테고리의 다른 글

putty 명령어  (0) 2017.10.12
posted by fori`s

centos7 톰캣설치

리눅스/Centos 2017. 10. 12. 10:10

1. jre, jdk 설치 (설치 되어 있지 않은 경우)

yum list java*jdk-devel

아래와 같이 설치할 수 있는 패키지 목록이 뜬다.

Available Packages

java-1.6.0-openjdk-devel.x86_64                                                                                       1:1.6.0.38-1.13.10.4.el6                                                                                       base   

java-1.7.0-openjdk-devel.x86_64                                                                                       1:1.7.0.99-2.6.5.1.el6                                                                                         base   

java-1.8.0-openjdk-devel.x86_64                                                                                       1:1.8.0.131-0.b11.el6_9                                                                                        updates


yum install java-1.7.0-openjdk-devel.x86_64 로 설치


2. 톰캣설치

wget http://archive.apache.org/dist/tomcat/tomcat-7/v7.0.50/bin/apache-tomcat-7.0.50.tar.gz

/usr/local 에 tomcat7이라는 폴더명으로 압축해제


3. 방화벽에서 포트 개방

 1) vi /etc/sysconfig/iptables 로 방화벽 설정을 연다. 

 2) 아래와 같이 INPUT ACCEPT [0:0] 밑에 지정 포트를 개방한다

- iptables 파일 내용

# Generated by iptables-save v1.4.7 on Tue Feb 28 16:53:24 2017

*filter

:INPUT ACCEPT [0:0]

#Tomcat Config

-A INPUT -m state --state NEW -m tcp -p tcp --dport 8080 -j ACCEPT

#other port enable

-A INPUT -p tcp -m tcp --dport 5858 -j ACCEPT

 3) 적용 

service iptables restart


4. 톰캣 실행

cd /usr/local/tomcat7/bin

./startup.sh


5. 부팅 시 자동시작 설정

cd /usr/local/tomcat7/bin

./startup.sh

위 명령어를 /etc/rc.local에 추가


vim /usr/local/tomcat7/conf/server.xml


포트는 8080을 8181로 변경


cd /usr/local/tomcat7/bin

./shutdown.sh

./startup.sh


참고로 특정 서버에 포트까지 열려있는지 확인하려면 tcping 이라는 프로그램을 이용하면 편리합니다.


'리눅스 > Centos' 카테고리의 다른 글

mysql mariadb설치  (0) 2017.11.02
아파치 설치  (0) 2017.11.02
CentOS 7 Oracle 11G Release 2 (11.2) DB 설치  (0) 2017.10.26
centos7 재부팅후 명령어  (0) 2017.10.12
posted by fori`s

centos7 재부팅후 명령어

리눅스/Centos 2017. 10. 12. 10:08

centos7 시작시.txt

centos7

systemctl restart named

service mariadb restart
systemctl stop firewalld
systemctl restart httpd.service

'리눅스 > Centos' 카테고리의 다른 글

mysql mariadb설치  (0) 2017.11.02
아파치 설치  (0) 2017.11.02
CentOS 7 Oracle 11G Release 2 (11.2) DB 설치  (0) 2017.10.26
centos7 톰캣설치  (0) 2017.10.12
posted by fori`s

putty 명령어

리눅스 2017. 10. 12. 09:35

* 파일/디렉토리 관련 명령어

  • ls : 디렉토리/파일 목록보기
  • ls -al : 숨겨진 디렉토리/파일 목록까지 정렬된 형태로 보기
  • cd (디렉토리이름) : 해당 디렉토리로 이동
  • cd : 최상위 디렉토리로 이동
  • pwd : 현재 디렉토리의 위치 보여주기
  • mkdir (디렉토리이름) : 해당 디렉토리 만들기
  • rm (파일이름) : 해당파일 지우기
  • rm -r (디렉토리이름) : 해당 디렉토리 지우기
  • rm -f (파일이름) : 강제로 해당파일 지우기
  • rm -rf (디렉토리이름) : 해당디렉토리와 디렉토리 아래에 있는 모든 파일 삭제
  • cp [파일1] [파일2] : 파일1을 파일2라는 이름으로 복사
  • cp -r [디렉토리1] [디렉토리2] : [디렉토리1] 안에 있는 것들을 [디렉토리2]로 복사/ [디렉토리2]가 존재하지 않는다면 [디렉토리2]를 만듬.
  • mv [파일1] [파일2] : [파일1]을 [파일2]로 이름을 바꾸거나 옮김. [파일2]가 디렉토리로 존재한다면 [파일1]을 [파일2] 디렉토리로 옮김.
  • touch [파일이름] : 해당파일을 생성하거나 업데이트
  • cat > [파일이름] : 입력을 해당이름으로 저장
  • cat < [파일이름] : 해당파일의 내용을 출력(모두 출력)
  • more [파일이름] : 해당파일의 내용을 출력(구분 출력)
  • head [파일이름] : 해당파일의 첫 10줄을 출력
  • tail [파일이름] : 해당파일의 마지막 10줄을 출력
  • tail -f [파일이름] : 해당파일에 추가되는 내용을 출력, 마지막 10줄부터 출력함.

* 프로세스 관련 명령어
  • ps : 현재 활성화된 프로세스 보여주기
  • top : 실행중인 모든 프로세스 보여주기
  • kill [프로세스 id] : 해당 프로세스를 종료(프로세스 idㄹ를 줄여서 pid라고 함/pid는 'ps'명령어를 입력하였을 때, 해당 프로세스의 맨 앞에 위치한 숫자를 의미한다.
  • bg : 정지되었거나 화면에서 안보이게 실행중인 프로세스 보여주기/정지된 프로세스를 화면에 출력하지 않고 계속 진행하기
  • fg : 화면에 보이지 않게 작동하던 작업 중 최근의 것을 화면에 출력하면서 작동시키기
  • fg n : 화면에 보이지 않게 작동하던 작업 중 n 번째 작업을 화면에 출력하면서 작동시키기

* 파일 권한(퍼미션)관련 명령어
  • chmod [권한숫자][파일이름] : 해당파일의 퍼미션값을 해당 권한숫자대로 바꾸고 숫자는 3자리이며 첫 번째는 소유자, 두번째는 그룹, 세번째는 익명의 권한을 더해서 나타낸다.

* 단축키
  • Ctrl+C : 현재 명령의 실행을 강제로 마침
  • Ctrl+Z : 현재 명령을 멈춤. fgf를 이용해서 계속해서 화면에서 보이도록 실행하거나 bg 를 이용해서 안보인채 계속 실행.
  • Ctrl+D : 현 세션에서 로그아웃, exit와 비슷
  • Ctrl+W : 현재 라인에서 한 단어 삭제
  • Ctrl+U : 현재 줄 전체 삭제
  • Ctrl+R : 최근 입력한 명령어 보여주기
  • !! : 마지막 명령어 반복실행
  • exit : 현재 세션에서 로그아웃


출처: http://smiler.tistory.com/entry/Putty-명령어 [아직은 내가 쓴 글보다 퍼온 글이 훨씬 많음]

'리눅스' 카테고리의 다른 글

리눅스 압축풀기 명령어  (0) 2017.10.12
posted by fori`s